The authors also highlighted the technical skill that was needed to produce and edit personalized videos. In 2007.
In 2015 (and for a few years back), it is not at all as hard to produce and edit video clips, because we have iMovie for iOS. Now, I originally taught myself iMovie about 14 years ago on the Mac, and it was quite a chore. After shooting video or compiling photos somewhere else, often a comparatively small but still clunky DV camera, you had to import the video (in real time) and use a complicated interface to edit it. iMovie for iOS (Free if you have purchased an iDevice after Oct 2013, otherwise $4.99) still has a bit of a learning curve--but the fact that you can shoot and edit by touch all on the same device goes a long way toward making these techniques accessible to our profession. Note that you can do much of the below on an iPod or iPhone as well, though the small screen will make it a bit trickier.
I had a great time with a group at Nova Southeastern doing an interactive demo session on iMovie recently--I'd like to make this a habit! As a group, we discussed the study mentioned above and decided on a task that I could be "prompted through," as an organizer recorded me and another gave me some cues when I "forgot" a step. We decided on something simple--pushing in a chair after leaving a table!
When you open iMovie, you begin by adding a new project, as in many other apps with the + symbol. iMovie has this great interface where you can create a Movie Trailer, but in this case we select "Movie."
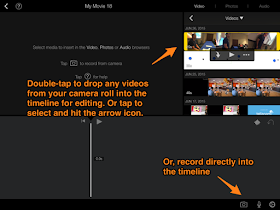
Once you have created a project, you can add video previously shot from your camera roll, or tap the camera to record directly into the timeline (the area used to build and edit the project). In this case we just added the recorded single clip of my being prompted to stand up and push in the chair!
Once the clip is added to the project, you'll want to navigate to any segment you want to edit, such that the play head (white line) is over the beginning or end of the segment. In this segment, the person to the side was giving me a verbal prompt we wanted to edit out. Be sure to tap the clip so it is highlighted in yellow, then tap Split. This creates two separate clips so you can simply edit the end of one or the beginning of the next, like so:
The beauty of editing in iMovie is that you can "trim" footage by moving the trim handle (yellow bar) to the left or right, which cuts or re-adds footage as you like. If you make a mistake, simply adjust--no need to start over. In this case, we moved the handle to the right until the video clip no longer contained the verbal prompt.
Proceed in this way to edit out any footage, including prompts or errors, so that students can see the situation going "as planned." iMovie allows you to do a lot more than this, and nice guides are here and here.
Like many iPad apps, your project saves automatically and you can return to edit it. Tapping on your project in the Projects area gives you many options for sharing: saving the edited video to the camera roll or publishing to YouTube, sending to Dropbox, etc.
I could spend a lot more time on iMovie, but hope this gives you a start!


Great Ideas, and clearly explained. I can see that this technique would be very useful for reflecting on self and/or client's progress. Cheers!
ReplyDeleteIt’s an amazing blog post, and it is really helpful as well.
ReplyDelete